CS 475, Spring 2019, Homework 3, Due Mar 27 11am 28, 11pm
Start by downloading the handout:
Please post questions on Piazza
Updates:
- 3/26: Clarified that getAll, putAll should not lock the directory itself, only the keys within. Clarified that getAll and putAll must always lock keys in the same order.
The purpose of this assignment is to get you familiar with RMI and locks in Java. We will build on the concepts of HW2, focusing specifically on creating a client-server environment. Again, our KV Store to have a notion of files and directories. Normally, KV stores are “dumb” about keys: there is no relationship between keys. However, some applications demand a notion of hierarchy more similar to file systems. That is, rather than have no relationship between keys, keys are organized like paths on a file system. In this scheme, the key “/a/b/c.txt” represents a file which is stored within a folder (the folder “/a/b/”), which is itself stored within a folder (“/a/”), which is itself stored within a folder (“/”). A user could query the KV store for the contents of “/”, which would return “/a/” — one of the directories that the key “/a/b/c.txt”
For this assignment, your task will be to build a client-server version of your key value store from HW2. Note that we will not grade you for the concurrency/synchronization issues as in HW2 – you will not be penalized again for those issues. You do not need to implement any of the fine-grained locking protocols from HW2. However, your implementation is still expected to reliably run – any races that interfere with grading will result in a deduction from 10 points allocated to overall concurrency issues.
We have also provided a baseline suite of unit tests, which you can execute by calling mvn -Ptest test
General requirements:
We have provided you a baseline implementation of the KV store that has various methods stubbed out, which you will implement. You may not include any additional libraries (e.g. download and and require additional JARs), although feel free to use any of the various libraries included with Java or already included by the starter project. Your project will be compiled and tested using Java 8, so please do not use any Java 9+ exclusive features (the first long-term support version of Java > 8 just came out in September; we’ll switch to Java 11 next semester, sorry).
Your KV Store will be compiled and tested using apache maven, which automatically downloads the various dependencies for VCFS and executes the provided JUnit tests. Please install Maven on your computer. Unfortunately, Maven is not installed on Zeus, however you can download the most recent version (e.g. apache-maven-3.5.2-bin.zip) and unzip it in your home directory. Then, to run maven, type ~/apache-maven-3.5.2/bin/mvn in the snippets below (instead of just mvn). Note that you can easily import maven projects into eclipse and IntelliJ.
To compile and run your server, independently of the tests, run mvn -DskipTests package in the top level directory of the handout and then, in the server directory run java -jar target/kvstore-server-2019.3.3-SNAPSHOT.jar <portnumber> to start the server, and to start the client, in the client directory run java -jar target/kvstore-client-2019.3.3-SNAPSHOT.jar <portnumber>. You can specify any free port number on your computer over 1024; we have hardcoded the client to assume that the client runs on the same computer as the server. You’ll notice that the text-mode interface we’ve provided for you has a handy help command. To build the jar file without running the tests, run mvn -DskipTests package.
For this assignment, we have provided you with a text-based interface to help you debug and test your client by hand. To use the shell, follow the instructions above to start the server, and to start the client. The client will offer you a command prompt, like this:
|
1
2
3
4
5
6
7
8
9
10
11
12
13
14
15
16
17
18
19
20
|
cs475sh:>help
AVAILABLE COMMANDS
Built-In Commands
clear: Clear the shell screen.
exit, quit: Exit the shell.
help: Display help about available commands.
history: Display or save the history of previously run commands
script: Read and execute commands from a file.
stacktrace: Display the full stacktrace of the last error.
Command
get: Get a key's value
get-all: Get all keys in a directory
list-directory: List a directory
list-keys: List all keys
put-all: Update all keys in a directory to have the given content
remove: Remove a non-directory key
remove-directory: Remove a directory
set: Set a key's value
|
As you implement the various functionality in the parts below, the commands above will begin to work.
Your KV store will be automatically graded for correctness (note that there will be a manual grading phase to check hard-to-automatically-catch concurrency issues). Included with your handout is all of the automated tests that we will use to test your assignment. Upon submitting your assignment, our server will automatically compile and test your assignment and provide you with test results. We will also for this assignment use a state-of-the-art race detector to check for races in your program – this will run automatically in Autolab. You can resubmit 50 times before the deadline without penalty. To run these tests, simply execute mvn test (of course, if you do this first off, you’ll see that they all fail!)
Note: Your code must compile and run on the autograder, under Java 8. It is unlikely that you will have any difficulties developing on a Mac, Linux or Windows, but please keep in mind the possibility of portability problems. When you feel satisfied with implementing one phase of the assignment, submit to AutoLab and verify that AutoLab agrees.
General coding/grading requirements:
- You should feel free to add whatever additional classes you wish, or any additional methods to the existing edu.gmu.cs475.KeyValueServer and edu.gmu.cs475.KeyValueClient. You must not modify the edu.gmu.cs475.IKeyValueServer interface, the edu.gmu.cs475.AbstractKeyValueClient, any of the tests, or any of the internal classes.
- Your code should be thread-safe: concurrent calls to any of these methods (or any other method in IKeyValueServer) should not have any races. It should now be clearer how this can occur — you will potentially have multiple clients attempting to interact with the server simultaneously. It is OK for you to use coarse-grained synchronization here, and we will not test for concurrent operations on your KVStore (unlike in HW2, where this was the primary focus).
- You must not store any state in static fields
- All concurrency-related grading will account for a total 0f 10% of your grade (see Part 5). We will only consider concurrency-concerns for the first 4 parts to the extent that they are preventing your assignment from passing the given tests under normal circumstances.
- Your client must not directly access the field kvServer – to contact the server it should just call the this.XXX methods (e.g. instead of kvServer._get(...), just _get(...)). This is required so that the tests can correctly and selectively mock out the server behavior.
Part 1: Migrating the existing API to RMI (20%)
Your KVStore will now have a single server that maintains the keys and their values. Multiple clients will be able to interact with a single server and perform the same operations as before.
The key focus for this part of the assignment will be to separate this functionality into a client-side and server-side component.
Your client and server will communicate over the edu.gmu.cs475.IKeyValueStore interface, which mostly contains all of the same operations from HW2, plus a few extra (which we’ll get to in Parts 2 and 3). The removeDirectoryRecursively operation is no longer required.
|
1
2
3
4
5
6
7
8
9
10
11
12
13
14
15
16
17
18
19
20
21
22
23
24
25
26
27
28
29
30
31
32
33
34
35
36
37
38
39
40
41
42
43
44
45
46
47
48
49
50
51
52
53
54
55
56
57
58
59
60
|
/**
* Retrieve an element from this key value store
*
* @param key the key to retrieve
* @return The value mapped to this key, if one exists, otherwise null
* @throws NullPointerException if key is null
* @throws IllegalArgumentException if the key represents a directory (ends in /)
* @throws IllegalArgumentException if the key does not start with a /
*/
public String get(String key);
/**
* Lists all of the keys that are currently known to this key-value store
*
* @return A set containing all currently valid keys
*/
public Set listKeys();
/**
* Sets a key to be the given value
*
* @param key key to set
* @param value value to store
* @throws NullPointerException if key or value is null
* @throws IllegalArgumentException if key does not start with a /
* @throws IllegalArgumentException if key represents a direcotry (ends with a /)
*/
public void set(String key, String value);
/**
* Removes this key and any values stored at it from the map
*
* @param key key to remove
* @return true if the key was successfully deleted, or false if it did not exist
* @throws NullPointerException if key is null
* @throws IllegalArgumentException if key does not start with a /
* @throws IllegalArgumentException if key represents a directory (ends with a /)
*/
public boolean remove(String key);
/**
* Lists the contents of a directory (non-recursively)
*
* @param directory path of the directory
* @return unsorted set of the files and directories inside of this directory, or null if the directory doesn't exist.
* @throws NullPointerException if key is null
* @throws IllegalArgumentException if the key does not represent a directory (does not end in a /)
* @throws IllegalArgumentException if the key does not start with a /
*/
public Set listDirectory(String directory);
/**
* Deletes an empty directory
*
* @param directory path of the directory
* @throws IllegalArgumentException if the key does not represent a directory (does not end in a /)
* @throws IllegalArgumentException if the key does not start with a /
* @throws DirectoryNotEmptyException if the directory is not empty
*/
public void removeDirectory(String directory) throws DirectoryNotEmptyException;
|
Implement your server in the server project, by implementing the empty methods in edu.gmu.cs475.KeyValueServer. You should feel free to reuse the code you had from HW2, or write something different (you’ll notice that the API changed slightly). We’ve gone ahead and already implemented the client-side versions of these methods (which simply make calls to the server).
When you are ready to check your work, you should run just the tests in the test class edu.gmu.cs475.P1RMIMigrationIntegrationTests. To do so from maven, you should run mvn -Dtest=P1RMIMigrationIntegrationTests test.
Precise grading breakdown:
- Automated functional tests (
edu.gmu.cs475.P1RMIMigrationIntegrationTests): 15 points
- 7 JUnit tests, 2 points each
- Manual feedback: 6 points
Part 2: Client operations and Heartbeat (40%)
We would like you to implement two bulk operations on the client side, allowing for bulk writes and bulk reads. Hence, your KeyValueClient has empty stubs for you to implement these methods.
Rather than set’ing a single key, putAll(directoryKey,value) will set many the value of every non-directory key that is directly nested within the directory directoryKey, and rather than returning the value of a single key, getAll(directoryKey) will return a map with all of non-directory key/value pairs that are directly nested within the directory directoryKey. Note that “directly contained” means “not recursively contained”, so in the example of /, /foo/, /foo/bar, only “/foo/” is directly contained by “/”.
The tricky part is that we need for these operations to be atomic ( putAll and getAll must only be atomic with regards to each other – there is no need to guarantee atomicity with regards to get) and set). To do so, your putAll and getAll will need to call the lock and unlock functions on your server. 3/26: To avoid deadlocks, make sure that in each call to getAll/putAll, you lock keys in the same order. Note that listDirectory returns an un-ordered set, so you will need to sort it. Implement the lock and unlock functions in your server using StampedLocks. StampedLocks are perfect for client/server operation — they are not reentrant. It is important to not use a reentrant lock here, because it is the server thread that would “own” the lock otherwise, and not the client. Since multiple clients might be serviced by the same server thread (and multiple requests from the same client could be processed by different server threads), it would lead to bizarre and unexpected behavior if we used a reentrant lock — the thread that owned the lock would have no correlation to the client we actually intend to be the holder of the lock. Instead, with a StampedLock, each call to lock() returns a unique stamp. The holder of that stamp then has the lock — this is the only record keeping that Java keeps of who is the current holder of the lock (the lock is not associated with the thread that acquired it, unlike in a ReentrantLock). To release the lock, that same stamp is passed to unlock(). Since StampedLocks are not reentrant, the lock is not owned by whichever server thread acquired it — instead, it is tied to the client (who receives the stamp). It is not necessary that you acquire the same locks in your get, set etc functions in the server: these locks will be used only to prevent concurrent getAll/ putAll calls on the same files.
We have also added one more new method to the client/server API beyond HW2: heartbeat. A heartbeat protocol can be used to detect when clients have disconnected. In our case, we want to use a heartbeat to determine that a lock should be deemed invalid: if a client crashes, we still want to allow other clients to proceed. The heartbeat protocol you will implement is very simple: if a client holds a lock, they must report to the server every 2 seconds that they are still using that lock. The server will keep track of every file that currently is locked. If the server has not heard from the client that holds a lock for over 3 seconds (note that this includes a 1-second grace period), it will assume that that client has crashed, and can no longer use the lock. In this case, the server will release the lock, allowing other clients to continue to perform contentious operations. This diagram shows the expected behavior of the heartbeat protocol:
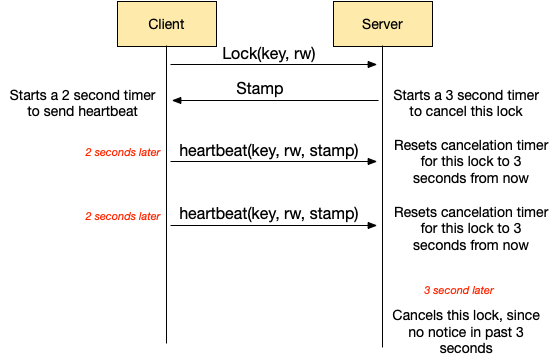
Expected operation of the heartbeat protocol with client and server responsibilities
Note that your client and server will need to maintain this protocol for each lock for each client. Your code will be expected to work even if one client takes out multiple locks (in which case each lock will have its own timer to send heartbeats), and where the server has to maintain multiple timeouts, as shown below:

Example of multiple clients with multiple locks, all sending heartbeats to the server.
Here are the new client methods:
|
1
2
3
4
5
6
7
8
9
10
11
12
13
14
15
16
17
18
19
20
21
22
23
24
25
26
27
28
29
30
31
32
33
34
35
36
37
38
39
40
41
42
43
44
45
46
47
48
49
50
51
52
53
54
55
56
57
58
59
60
61
62
63
64
65
66
|
/**
* Prints out all keys that have are directly nested within the given
* directory. Must internally synchronize to guarantee that each key returned
* does not change during its execution (using a read/write lock). You should acquire
* all of the locks, then read all of the keys and release the locks. Your code should not
* deadlock while waiting to acquire locks.
*
* Your implementation must follow exactly this scheme:
* 1. Acquire all locks
* 2. Read all values
* 3. Release all locks
* (You may not release any locks until you are finished reading)
*
* @param directory to search within
* @return A map of every key=value pair directly contained by the given directory
* @throws IllegalArgumentException if the key does not represent a directory (does not end in a /)
* @throws IllegalArgumentException if the key does not start with a /
* @throws RemoteException if any IOException occurs in the underlying RMI operation
*/
public Map<String, String> getAll(String directory) throws IllegalArgumentException, RemoteException;
/**
* Sets the content for all keys that are directly contained by the given directory.
* Must internally synchronize to guarantee that each key being set does not
* change during its execution (using a read/write lock)
*
* Given two concurrent calls to putAll, it will be indeterminite
* which call happens first and which happens last. But what you can (and
* must) guarantee is that all keys affected will have the *same* value (and not
* some the result of the first, and some the result of the second). Your
* code should not deadlock while waiting to acquire locks.
*
* Your implementation must follow exactly this scheme:
* 1. Acquire all locks
* 2. Write all values
* 3. Release all locks
* (You may not release any locks until you are finished writing)
*
* @param directory Directory to do updates within
* @param content The content to write out to each key
* @throws IllegalArgumentException if the key does not represent a directory (does not end in a /)
* @throws IllegalArgumentException if the key does not start with a /
* @throws RemoteException if any IOException occurs in the underlying RMI operation
*/
public void putAll(String directory, String content) throws RemoteException, IllegalArgumentException;
/**
* A callback for you to implement to let you know that a lock was
* successfully acquired, and that you should start sending heartbeats for
* it
*
* @param name
* @param forWrite
* @param stamp
*/
public void lockKeySuccess(String name, boolean forWrite, long stamp);
/**
* A callback for you to implement to let you know a lock was relinquished,
* and that you should stop sending heartbeats for it.
*
* @param name
* @param forWrite
* @param stamp
*/
public void unlockKeyCalled(String name, boolean forWrite, long stamp);
|
New server methods:
|
1
2
3
4
5
6
7
8
9
10
11
12
13
14
15
16
17
18
19
20
21
22
23
24
25
26
27
28
29
30
31
32
33
34
|
/**
* Acquires a read or write lock for a given key. Accepts any valid key (directory or non).
*
* @param key Key to lock
* @param forWrite True if a write lock is requested, else false (for read lock)
* @return A stamp representing the lock owner (e.g. from a StampedLock)
* @throws IllegalArgumentException If the key doesn't exist
*/
public long lockKey(String key, boolean forWrite) throws IllegalArgumentException;
/**
* Releases a read or write lock for a given key. Accepts any valid key (directory or non).
*
* @param key Key to unlock
* @param stamp the Stamp representing the lock owner (returned from lockKey)
* @param forWrite True if a write lock is requested, else false (for read lock)
* @throws IllegalArgumentException If the key doesn't exist
* @throws IllegalMonitorStateException if the stamp specified is not (or is no longer) valid
*/
public void unLockKey(String key, long stamp, boolean forWrite) throws IllegalArgumentException, IllegalMonitorStateException;
/**
* Notifies the server that the client is still alive and well, still using
* the lock specified by the stamp provided
*
* @param key The key (same exact name passed to lockKey) that we are
* reporting in on
* @param stampId Stamp returned from lockKey that we are reporting in on
* @param isWrite if the heartbeat is for a write lock, else false (for read lock)
* @throws IllegalMonitorStateException if the stamp specified is not (or is no longer) valid, or if
* the stamp is not valid for the given read/write state
* @throws IllegalArgumentException if the key specified doesn't exist
*/
public void heartbeat(String key, long stampId, boolean isWrite) throws RemoteException, IllegalArgumentException;
|
For this part of the assignment, it’s your job to implement functionality in your client so that whenever a lock is acquired, it will begin sending heartbeats for that lock. 3/11: lockKeySuccess should start the process of sending heartbeats; if it encounters any remoteException, it should print the error (but not re-throw it). As multiple locks are acquired, the client will send multiple heartbeats. As locks are unlocked, those heartbeat timers will be canceled. If a heartbeat request results in an exception (e.g. an IllegalMonitorStateException or other exception), your client should stop sending those heartbeats (but of course, continue with any others that haven’t thrown exceptions). You should start sending heartbeats when lockFileSuccess is called, and stop sending them when unlockFileSuccess is called. Also, you must call “this.set” or “this.get”, not “super.set” or “super.set”.
We will grade your client and server side implementation of the heartbeat protocol separately. We have provided a set of tests, edu.gmu.cs475.P2HeartbeatClientTests and edu.gmu.cs475.P2HeartbeatBulkTests, which automatically mock a correctly functioning server — running your client against this fake server. To run this from maven, you should run mvn -Dtest=P2HeartbeatClientTests,P2HeartbeatBulkTests test.
Hint: You might find it useful to use Java’s ScheduledExecutorService to implement your timers (but you are free to use other implementations too). Keep in mind that any timer service you use will be inherently concurrent: you’ll have timers executing at the same time as your application; multiple timers might be executing concurrently.
Precise grading breakdown:
- Automated functional tests (
edu.gmu.cs475.P2HeartbeatClientTests and also
edu.gmu.cs475.P2HeartbeatBulkTests): 39 points
- 13 JUnit tests, 3 points each
- Manual feedback: 1 point
Part 3: Server Heartbeats and Leases (20%)
With the client-side protocol implemented, your next task will be to implement server functionality to track which locks have been acquired, and expire locks as necessary. Again, we will grade your server and client implementations separately.
For testing purposes, you’ll also implement two functions to report the list of read and write locked keys:
|
1
2
3
4
5
6
7
8
9
|
/**
* Get a list of all of the keys that are currently write locked
*/
public List getWriteLockedKeys() throws RemoteException;
/**
* Get a list of all of the keys that are currently write locked
*/
public List getReadLockedKeys() throws RemoteException;
|
Recall that although the client will be sending its heartbeat messages every 2 seconds, the server’s task is to keep track of when each lock was last heartbeat’ed, and expire locks that haven’t been reported in on in 3 seconds. Each lock might have been last heard from at a different time, and hence, your server will need to track this information per-lock holder.
Again, we will grade your client and server side implementation of the heartbeat protocol separately. We have provided a set of tests, edu.gmu.cs475.P3ServerTests, which automatically mock a correctly functioning client — running your server against this fake client and simulating error conditions. To run this from maven, you should run mvn -Dtest=P3ServerTests test.
Precise grading breakdown:
- Automated functional tests (
edu.gmu.cs475.P3ServerTests): 18 points
- 6 JUnit tests, 3 points each
- Manual feedback: 2 points
Part 4: Integration tests (10%)
We have also provided a very small suite of integration tests, which run your actual client against your actual server (rather than a fake client or fake server). These integration tests also simulate client failures. You’ll find these integration tests in edu.gmu.cs475.P4IntegrationTests.
Your goal here is simply to pass all of these tests – if you did all three parts above correctly, then these should work fine.
Precise grading breakdown:
- Automated functional tests (
edu.gmu.cs475.P4IntegrationTests): 10 points
- 5 JUnit tests, 2 points each
Part 5: Concurrency (10%)
To receive a top score on this assignment, you will also need to be sure that your code has no races. For this assignment, we will be using the tool, RV-Predict to detect races that may occur while running your tests. RV-Predict will give you precise feedback on the races that it detects, for instance:
|
1
2
3
4
5
6
7
8
9
10
11
12
13
14
15
|
Data race on field account.Account.Bank_Total: {{{
Concurrent write in thread T12 (locks held: {})
----> at account.Account.Service(Account.java:98)
at account.BankAccount.Action(BankAccount.java:41)
at account.BankAccount.run(BankAccount.java:56)
T12 is created by T1
at account.Account.go(Account.java:46)
Concurrent read in thread T13 (locks held: {})
----> at account.Account.Service(Account.java:98)
at account.BankAccount.Action(BankAccount.java:41)
at account.BankAccount.run(BankAccount.java:56)
T13 is created by T1
at account.Account.go(Account.java:46)
}}}
|
AutoLab will automatically run RV-Predict on all of your submissions. You can run it on your own computer by downloading and installing it (it’s free for non-commercial use). When you run your tests with maven, use the command mvn -Drvpredict=/path/to/rv-predict.jar test (on Mac this would be mvn -Drvpredict=/Applications/RV-Predict/Java/lib/rv-predict.jar test).
We will not give you a direct equation to correlate from # of reports from RV-Predict -> a grade on this section. We will manually award up to 10 points for concurrency correctness based on no apparent races and no over-synchronization (again, one way to avoid races could be to force every operation to be serial; this would not be ideal or correct). Moreover, note that RV-Predict will find many races, but will not find all races, which we might by hand! Note also that if you make wide use of stamped locks (instead of reentrant locks or synchronized blocks), RV-Predict will report that races are possible because it can not analyze stamped locks.
Grading
Your assignment will be graded on a series of functional tests, making sure that it implements the specification above.
Hand In Instructions
You must turn in your assignment using Autolab (You MUST be on the campus network, or connected to the GMU VPN to connect to Autolab). If you did not receive a confirmation email from Autolab to set a password, enter your @gmu.edu (NOT @masonlive) email, and click “forgot password” to get a new password.
Create a zip file of the root directory in your assignment (please: .zip, not .tgz or .7z etc) — this is the root directory that includes the client, shared, server directories. Do not include the compiled .jar file in your upload, or your upload may fail. To remove it, run mvn clean. When you upload your assignment, Autolab will automatically compile and test it. You should verify that the result that Autolab generates is what you expect. Your code is built and tested in a Linux VM. Assignments that do not compile using our build script will receive a maximum of 50%. Note that we have provided ample resources for you to verify that our view of your assignment is the same as your own: you will see the result of the compilation and test execution for your assignment when you submit it.
You can resubmit your assignment up to 50 times before the deadline. Note the course late-submission policy: assignments will be accepted up until 24 hours past the deadline at a penalty of 10%; after 24 hours, no late assignments will be accepted, no exceptions.
Note – You MUST be on the campus network, or connected to GMU VPN to connect to Autolab.
Decoding the output:
Note, AutoLab will run your code on the tests twice: once without RV-Predict (these are the scores used for parts 1-4), and once with RV-Predict (this is informational only). The outcomes should be the same with or without RV-Predict, but we wanted to make 100% sure that adding the tool doesn’t break your otherwise seemingly functioning code.
For the mock-based tests, you’ll receive errors that look like this:
|
1
2
|
Unexpected method call KeyValueClient.heartbeat("/tests/p1/testMultipleClientsLockSamekeySomeFailingToHeartbeat", 266 (long), false):
KeyValueClient.heartbeat("/tests/p1/testMultipleClientsLockSamekeySomeFailingToHeartbeat", , true): expected: between 2 and 3, actual: 0
|
or:
|
1
2
3
|
Unexpected method call IKeyValueServer.listDirectory("someKey"):
IKeyValueServer.listDirectory("/testDirectory/"): expected: at least 1, actual: 0
IKeyValueServer.lockKey(, false): expected: 2, actual: 0
|
These errors are describing the expected sequence of method calls and how your code deviated from that. In the first, it states that the heartbeat method was expected to be called with a specific key, any lock stamp and for write. This was expected 2 or 3 times, but never happened. In the second, the test expected listDirectory and lockKey to be called, but when listDirectory was called, the parameter was wrong (note difference between “/testDirectory/” and “someKey”).
Questions
Please post questions on Piazza