SWE 432, Fall 2018, Homework 3, Due Oct 29, 10 am
Please post questions on Piazza
Project Overview
This semester, while you learn the key concepts of web application development, you will apply these skills to build a meme generator, which we will refer to as the Memebase. A meme is a cultural phenomenon that combines some popular graphic (for example, a cat or TV/movie character) with large-block text. As an example, here is a meme generated by combining a graphic called “news cat” with some text relevant to this project:
You will build the Memebase in four different components; each assignment will be one component. Each component will conform to a common interface, allowing them to be independently developed and tested. The final result will be a working website that allows users to generate memes, create accounts to share and track their memes.
This Assignment
For the third component, you will build a frontend service that lets users generate memes from a pre-defined set of templates.
Getting Started
You’ll need to install Node.js on your computer — version 8 or higher. You can follow the instructions on the Node.js installation page for the “LTS” version to get it installed.
It is not required that you use an IDE, but it’s a really really really really good idea. JetBrains’ IntelliJ/WebStorm is a great choice — if you already have IntelliJ you can add the NodeJS component to it, or simply download WebStorm. You can get a free license to use any of the JetBrains IDEs by filling out this simple form.
Then, you are ready to get started. Download the handout, extract it, and then open a terminal in the handout directory. Run the command npm install, which will download all of the JavaScript modules that the assignment will use.
Overview
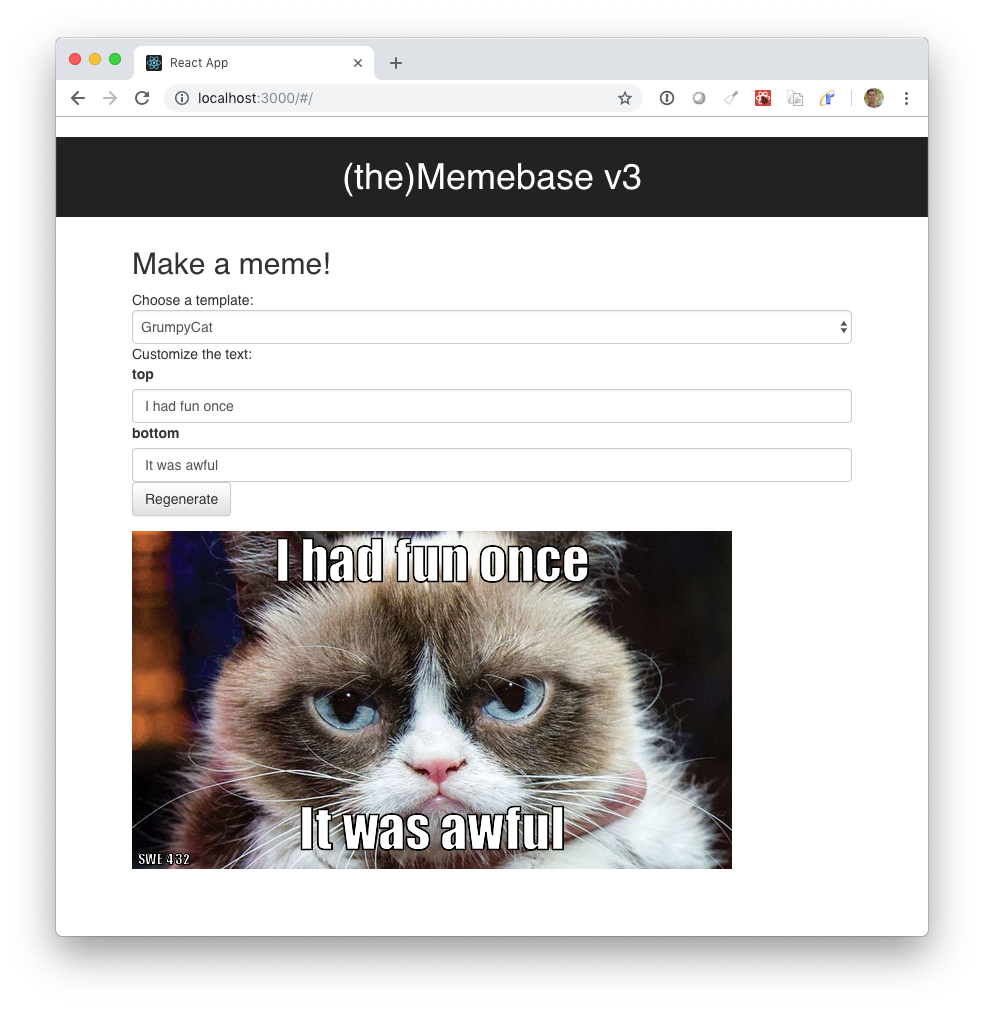
You’ll be building a single-page React application that interacts with our backend to create memes in the browser. Here’s a screenshot of what it will look like when it’s done:
 You will implement two react components –
MemeGeneratorApp and
MemeCustomizer, step by step.
You will implement two react components –
MemeGeneratorApp and
MemeCustomizer, step by step.
This assignment does not have any automated tests – you’ll test it yourself in the browser, and have to judge for yourself when it’s done.
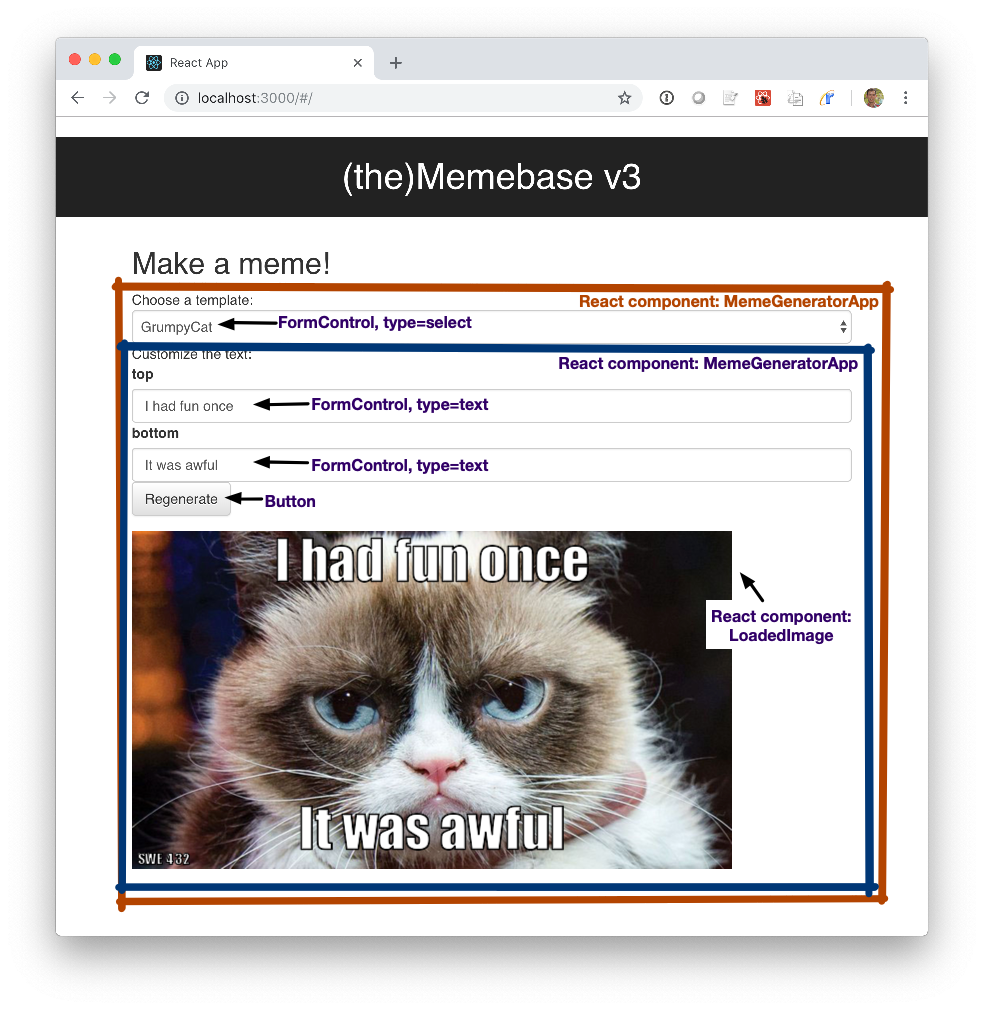
For your reference, here’s an overview of the key react components that make up this page:
We’ve intentionally written up this assignment so that it starts off like a tutorial (in Part 1), and decreases in guidance as you progress.
All of your implementation will be in the file MemeGenerator.js
You can compare your implementation to our reference implementation, available at: http://reference.thememebase.com/
Helpful Links:
JavaScript reference book – Free access on campus or on VPN
Part 1 (20 points): The template selector
Adding a dropdown, with no options in it: Start off this assignment by adding the “Choose a template” dropdown menu. You should use a React-Bootstrap FormControl. Add this FormControl in the render method of your MemeGenerator. The template selector will be populated with a list of templates collected from our web service – we’ve provided you with a simple client client that implements this functionality. First we’ll fetch the templates from the service and store them in our MemeGenerator’s state, and then we will update the render method to render that state.
Check your progress: When you view your app, you should see an empty dropdown menu.
Fetching the options, adding to state: The state of this component will include two properties: selectedTemplate and availableTemplates. We’ll populate this in the componentDidMount React Lifecycle event. You can call client.getTemplate() to get a list of all of the template objects (they will be in the exact same format as HW2), which will return a Promise. After you get the list of available templates, you should call this.setState, setting availableTemplates to be the entire list of templates, and selectedTemplate to be the first template that’s returned.
Check your progress: When you view your app using the React developer tools (in Chrome or Firefox), after a moment you should see the state of your MemeGenerator component updated to include the list of available templates.
Add a loading message: In your render method for the MemeGenerator component, add a check at the start: if the two state variables that you’ve now configured are undefined, then your MemeGenerator should simply display the text “Loading…”. Otherwise, show your dropdown menu.
Check your progress: When you view your app, it should first show Loading (briefly) and then it will disappear and show your empty dropdown menu.
Update your render method to include the list of available templates: Inside of your FormControl, add a loop over all of the available templates (the keys in this.state.availableTemplates). For each template, add an option element, with its value being the name of the template, its key also being the name of the template, and its contents also being the name of the template.
Check your progress: When you view your app, your dropdown menu should now have the templates listed in it.
Turn the template selector into a controlled component: Set the value parameter for your FormControl to {this.state.selectedTemplate}, causing it to become a controlled component. Create an onChange handler that will update the MemeGenerator component’s state to reflect the newly selected template.
Check your progress: When you view your app and change the selected template, you should see the state update to reflect this change in the React developer tools panel.
Part 2 (20 points) Rendering text fields for the template
Create the MemeCustomizer component: As you can see in the annotated version of the app above, the MemeCustomizer component contains most of the magic for the app. This component will be a sub-component of your MemeGenerator, and you’ll need to pass it two properties from the MemeGenerator’s state – the selected template’s name and the entire template description for that selected template.
Define MemeCustomizer state: The MemeCustomizer will keep track of the new meme that the user is creating as state variables. We’ll create a state variable called text to store the values of each of the text fields for the meme template. Initialize this text state variable so that it has one property for each text field, with the value of each property the name of that field. For instance, if the meme template has only the text fields top and bottom then your state should look like this.state = {text: { top: "top", bottom:"bottom"}}. Note that this will only handle the starting state of the component: when the selected template is changed, your component won’t refresh (until the last step part 2).
Add the text fields in a form: Start to implement your render method for the MemeCustomizer by adding a form, within which you can add a FormGroup (it’s not necessary that every form element is in a form, but doing so allows the browser to know what to do when the user presses “return” inside of a form field). Loop over the text fields for the selected meme template, and emit a FormControl of type text for each one. Make sure to add a unique key attribute to each control.
Bind the text fields to the state, add an event handler to update it: Set the value of each of these text fields to be the appropriate state variable. Add an onChange event handler for each text field to update the state of that text field as the user types in it. Your onChange handler might need to know which text box is being updated – you can solve this by referencing the control’s key, or by creating a new handler for each control that captures the text element ID in a closure (like in the editable todo example).
Add a lifecycle listener to refresh your state when the selected meme template changes: Add a componentDidUpdate(prevProps) method to your MemeCustomizer. This will be called every time that the properties of the component are updated, allowing you to see what changed by comparing prevProps with this.props. When the selected template is changed, you should update the state of the MemeCustomizer so that the text fields reflect those of the new template (e.g. when switching to Gru, you’ll get steps 1-4, with new default text in each).
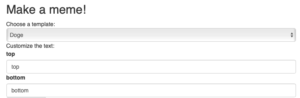
When you finish part 2, it should look something like this:
Part 3 (30 points) Generating template graphics
Fetching the demo image: When the MemeCustomizer is rendered, we want to show a preview of the meme that is being generated. For instance, when initially loaded, if Doge is selected, the app will look like this:

To do so, we’ll call client.generateMeme, which takes two parameters: the name of the template, and a text object that is of the format: let text = { textFieldName: "textFieldValue", otherTextFieldName: "otherTextFieldValue"}. client.generateMeme returns a promise for the image data — when you get the data back, store the image in a state field called imgData.
Rendering the image: Add a LoadedImage component to your MemeCustomizer’s render method, setting the src property to be this.state.imgData.
If you’ve completed these steps correctly, you should see the image as it appears above.
Regenerating the demo image when the selected template changes: As part of your componentDidUpdate implementation, also ensure that you regenerate the image to match the new template when a new template is selected. Since we are storing the image data as part of the component’s state, when you get the refreshed image, calling setState with the updated state should then update the image that’s displayed.
Part 4 (30 points) Generating the actual memes
Adding and wiring the regenerate button: Add a Button of type submit to your MemeCustomizer inside of the Form called “Regenerate” and use an onSubmit handler for the form so that when the user submits the form (which will happen either clicking the button or pressing return in one of the text fields), the meme that is displayed is regenerated (using the same client.generateMeme used in part 4), but using the text that the user has now entered.
Locking out the MemeCustomizer component while update is pending: While there is a pending request to generate a new meme (e.g. from a prior submission), the text fields should become disabled and the submit button should become disabled. You should keep track of whether these components are disabled or not using a single state variable.
Grading
Your meme generator will be graded by hand (as described in each section above). When you submit to Autolab, it will not grade your submission at all. We will grade for correctness on the above points — and you should test your functionality by hand as well.
Hand In Instructions
You must turn in your assignment using Autolab (You MUST be on the campus network, or connected to the GMU VPN to connect to Autolab). If you did not receive a confirmation email from Autolab to set a password, enter your @gmu.edu (NOT @masonlive) email, and click “forgot password” to get a new password.
To prepare your code to be submitted, run npm pack in the assignment directory. This will create an archive thememebase-3.0.0.tgz – this is what you will submit to Autolab. Do not try and generate this archive without using npm; it’s highly likely to cause Autolab to reject it.
You can resubmit your assignment an unlimited number of times before the deadline. Note the course late-submission policy: assignments will be accepted up until 24 hours past the deadline at a penalty of 10%; after 24 hours, no late assignments will be accepted, no exceptions.
Questions
Please post questions on Piazza