SWE 622, Spring 2017, Homework 5, due 4/28/2017 4:00pm. (Note extension)
Introduction
Throughout the semester, you will build a sizable distributed system: a distributed in-memory filesystem. The goal of this project is to give you significant hands-on experience with building distributed systems, along with a tangible project that you can describe to future employers to demonstrate your (now considerable) distributed software engineering experience. We’ll do this in pieces, with a new assignment every two weeks that builds on the prior. You’re going to create an actual filesystem – so when you run CFS, it will mount a new filesystem on your computer (as if you are inserting a new hard disk), except that the contents of that filesystem are defined dynamically, by CFS (rather than being stored on a hard disk).
While we’re not focusing on making this a high-throughput system (for simplicity, we are implementing the filesystem driver in Java, which will inherently add some sizable performance penalty compared to implementing it in native code), you should be able to see the application of our system on the real world: often times, we build services that need to share data. If the total amount of data that we need to store is large, then we’ll probably set up some service specifically devoted to storing that data (rather than storing it all on the same machines that are performing the computation). For performance, we’ll probably want to do some caching on our clients to ensure that we don’t have to keep fetching data from the storage layer. Once we think about this caching layer a little more, it becomes somewhat more tricky in terms of managing consistency, and that’s where a lot of the fun in this project will come in. Here’s a high-level overview of the system that we are building:
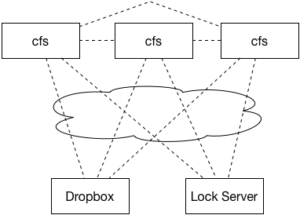
Each computer that is interested in using the filesystem will run its own copy of the filesystem driver (we’ll call it the CloudFS, or CFS for short). We’ll use Dropbox’s web API to provide the permanent storage, and will implement a cache of our Dropbox contents in our cfs driver. A lock service will make sure that only a single client writes to a file at a time (HW2). Over the course of the semester, we’ll set up the cache to be distributed among multiple CFS clients (HW3), distribute the lock server between the clients to increase fault tolerance (HW4), investigate fault recovery (HW5), and security and auditing (HW6).
Acknowledgements
Our CloudFS is largely inspired by the yfs lab series from MIT’s 6.824 course, developed by Robert Morris, Frans Kaashoek and the 6.824 staff.
Homework 5 Overview
We’re going to make a slight change to our system model of CFS for this assignment. In this assignment, we’re going to look specifically at fault tolerance. Up to this point, we have assumed that no Redis servers fail, although we have implemented some mechanisms to detect this happening (namely, group membership with ZooKeeper and WAIT).
This assignment totals 80 points, and will correspond to 8% of your final grade for this course.
Getting Started
Start out by importing the HW5 GitHub repository. Then, clone your private repository on your machine, and import it to your ide. Copy your CFS client from HW4 into your HW5 project. You may choose to start your HW5 CloudProvider from scratch, or build directly upon what you had in HW4. If you copy your RedisCacheProvider from HW4, please note that the constructor has changed for HW5 to set up the ZooKeeper + Redis connections.
You’ll notice there are now several projects in the repository:
-
fusedriver– Your CFS driver, just like in HW4 -
lock-server– The Lock server code, just like in HW4. You should not change anything in this directory. The semantics for the lock server will be implemented by each client, on top of ZooKeeper. The lock server exists to create a cluster of ZooKeeper servers for your CFS clients to connect to.
You’ll also find a Vagrantfile in the repository, similar to the configuration used for HW4. It will not run the default Redis server.
At a high level, your task is to modify your edu.gmu.swe622.cloud.RedisCacheProvider so that: (1) it uses a LeaderLatch to determine which Redis server will be the master (and configures itself to do so) (2) proactively checks on the health of its Redis instance and manages its group membership appropriately and (3) automatically fails-over from one Redis master to another. Note that for this assignment, you will be graded on all error handling aspects of your ZooKeeper interactions (that is, prepare for the possibility that a ZooKeeper operation might not succeed).
Additional details are provided below.
Tips
You should copy your config.properties over from HW4.
You can run the lock server in the VM, by running:
|
1
2
|
vagrant@precise64:/vagrant$ mvn package
vagrant@precise64:/vagrant$ java -jar lock-server/target/CloudFS-lock-server-hw4-0.0.1-SNAPSHOT.jar
|
And, you can run the CFS client:
|
1 |
vagrant@precise64:/vagrant$ java -jar fusedriver/target/CloudFS-hw4-0.0.1-SNAPSHOT.jar -mnt cfsmnt
|
The first time you run it, you’ll need to re-authorize it for Dropbox (the config files that authorized it before were local to the HW1,2,3,4 VM).
Debugging remote JVMs
You can launch a Java process and have it wait for your Eclipse debugger to connect to it by adding this to the command line:
|
1 |
-Xdebug -Xrunjdwp:transport=dt_socket,server=y,address=5005
|
After you make this change, disconnect from the VM if you are connected, then do “vagrant reload” before “vagrant ssh” to apply your changes.
Then, in Eclipse, select Debug… Debug configurations, then “Remote Java Application”, then “create new debug configuration.” Select the appropriate project, then “Connection Type” => “Standard (socket attach)”, “Host” => “localhost” and “port” => 5005 (if you are NOT using Vagrant) or 5006 (if you ARE using Vagrant).
Testing
A good way to test this assignment will be to have multiple instances of CFS running, each mounting your filesystem to a different place. Then, you can observe if writes appear correctly across the clients.
Dealing with ZooKeeper
ZooKeeper is set up to not persist any of its state to disk. That is, if you kill the ZooKeeper server and then restart it, it will be empty. This is done to make it easier for you to test: if you accidentally take out locks on everything, then your client crashes, it’s annoying to clean everything up. This way, if you ever end up in an inconsistent state, you can always stop the ZooKeeper server and restart it (bringing it back to a clean state). Of course, this means that the ZooKeeper is not very fault tolerant – but is just a configuration option, that’s easily changed if we wanted to make it so.
Remember to make sure that you close your ZooKeeper session before your CFS client terminates! This will allow for automatic cleanup of things like locks and group membership. A good way to do it is by adding this code early on, for instance in your main function:
|
1
2
3
4
5
6
7
|
Runtime.getRuntime().addShutdownHook(new Thread(new Runnable() {
@Override
public void run() {
curator.close();
}
}));
|
Part 1: Redis Master Latch (30 points)
To eliminate the Redis master server as a single point of failure (and the configuration annoyance of setting it up), we’re going to no longer pre-designate a server as the master. Instead, we’ll use a LeaderLatch to allow multiple CFS clients to compete at the same time to be the master – and ZooKeeper will guarantee that exactly one of them wins as the leader.
Technically, this will involve:
- Each CFS client will create a LeaderLatch at the same path (say, /leader/redis). When creating the latch, each CFS client will specify the hostname and port for its local Redis server.
- After starting the latch, the leader can be determined by calling getLeader().
- If your CFS client is the leader, then it should configure its Redis server as a master. If it is not, then it should configure itself as a slave of the leader.
Make sure to handle various error conditions, which might include:
- Inability to create the latch
- Inability to get the current leader
- Disconnection or other failure causing you to no longer be the leader
In these cases, it is probably wise to throw an IOException() which will then get propagated back to the process trying to use your filesystem.
Part 2: Proactive health checking, WAIT with timeout (30 points)
As we learned in Lab 8, ZooKeeper isn’t going to kick out the leader (or group member) just for crashing – it will time out, but it won’t be for some time (30 seconds typically). 30 seconds can be a long delay. We want to proactively monitor our Redis instances’ health: if we know that it’s offline, then we can immediately remove it from ZooKeeper, hastening its eventual removal. Your CFS client should implement a timer, every 2 seconds, issuing a simple PING command to Redis. If Redis doesn’t respond to the ping, then your CFS client will have to take action:
- If the client is serving as the leader (its Redis is the master), then it should immediately try to issue the SHUTDOWN command to that Redis instance, recuse its leadership, and leave the group membership. It should never try to become a leader again. The client can continue to serve requests if a new leader appears (using the new leader for all Redis queries).
- If the client is serving as a slave, then it should try to issue the SHUTDOWN command to that Redis instance and leave the group membership. It should never try to become a leader. It can continue to serve requests using whoever is the current leader.
Now that we are considering Redis servers failing (and handling that in some way), we need to take this into account when we call WAIT after a write to Redis. Now, when your clients want to write to Redis, they should call WAIT and specify a timeout of 30 seconds. After WAIT returns, the client should check that the return value of WAIT matches the number of live Redis servers (as reported by the Curator group from HW4). If it doesn’t, the client should try to WAIT one more time for 30 seconds, and then check the return value once again (again, fetching from Curator/ZK the number of live Redis servers, as returned by group.getCurrentMembers()). If you are still in contact with ZooKeeper at this point, that would mean that something catastrophic and bizarre has happened (certainly it’s not that you are partitioned, because you can still interact with a quorum of ZK servers), and you can throw an IOException. More likely, the number of servers returned by group.getCurrentMembers() will have gone down (because the cluster realized that the server failed and removed it), and we will abandon the missing replicas (as above).
Be sure to consider concurrent interactions in this code. In particular, while you are changing the configuration of your CFS client’s Redis parameters, it is probably not safe to serve any requests. You can solve this by using a local lock on your client: create a ReadWriteLock called redisConfig. When a request is served (e.g. get, put, etc), acquire the read lock of redisConfig. When you have to modify the Redis configuration, acquire the write lock on redisConfig (hence, blocking other operations).
Part 3: Redis Server Failover (20 points)
Once a Redis master fails, we need to have the CFS clients detect the failure, find a new leader, and re-configure the environment so that the newly appointed leader serves as the Redis master and all other Redis servers become slaves to that one. You should implement a watch on your CFS clients to detect that the leader is gone, and initiate failover. Note that there are two cases that clients need to handle here:
- The client became the leader, and needs to promote its Redis configuration to be a master
- The client did not become the leader, and needs to reconfigure itself to use that new leader
You will want to use the Redis SLAVEOF command to promote and reconfigure replicas.
As with part 2, you should be careful to consider concurrent interactions between changing the Redis configuration and regular filesystem operations.
In the real world, we would want to use a complex protocol here to make sure that the slave with the most data replicated to it became the master. For the purpose of this assignment, we’ll assume that all slaves have received the exact same replica information, and hence, it doesn’t matter which we pick to become the new master.
Submission
Perform all of your work in your homework-5 git repository. Commit and push your assignment. Once you are ready to submit, create a release, tagged “hw5.” Unless you want to submit a different version of your code, leave it at “master” to release the most recent code that you’ve pushed to GitHub. Make sure that your name is specified somewhere in the release notes. The time that you create your release will be the time used to judge that you have submitted by the deadline. This is NOT the time that you push your code.
Make sure that your released code includes all of your files and builds properly. You can do this by clicking to download the archive, and inspecting/trying to build it on your own machine/vm. There is no need to submit binaries/jar files (the target/ directory is purposely ignored from git). It is accepted (and normal) to NOT include the config.properties file in your release.
If you want to resubmit before the deadline: Simply create a new release, we will automatically use the last release you published. If you submitted before the deadline, then decide to make a new release within 24 hours of the deadline, we will automatically grade your late submission, and subtract 10%. Any releases created more than 24 hours past the deadline will be ignored.